Create A Facebook Ad — Facebook Ads Maker FREE Online | VistaCreate
Make Facebook Ads Free that Standout
With VistaCreate, you can quickly create Facebook Ad for free that pop-off the page and attract target users.
Animate Your Fb Ads
VistaCreate makes it ultra-easy to create video ads for Facebook and put the power of animation to work. A collection of templates and tools enable you to quickly design a Fb ads featuring fun, high-quality animations and videos.
Free Online Tools that Simplify Facebook Ad Design
VistaCreate allows you to quickly create remarkable Fb ads online with its powerful and free Facebook ad maker.
Templates
Animation
Upload
Edit
Resize
Objects
Pick a Template
We challenged our graphic designers to create the richest library of predesigned templates and they responded with more than 20,000 of them. Pick your favorite and go ahead.
Put Your Ad in Motion
Want your Facebook ads to rock the page? A large collection of templates featuring motion graphics makes it simple to make cool animations.
Customize Your Ad
Upload images, videos, and graphic elements to put a personal touch on the template you choose and add or subtract any elements as needed.
Edit Your Design
Customize anything and everything you want — text, fonts, backgrounds, images, and more.
Make an Ad a Post (and Vice Versa)
A beautiful thing about VistaCreate is that it empowers you to make derivatives of anything you create. With a single click you can resize and reformat your design. Choose a new format for your post or enter custom dimensions.
Add Finishing Touches
Enhance your Facebook advertising with all kinds of objects such as animations, illustrations, shapes, stickers, icons, or frames.
Media Library
VistaCreate offers you a selection of 80 million photos to use in your Facebook ads. You also get in-app access to more than 7,600 design objects from the media library to turn your vision into reality.
Stock Video
There's a huge library of short video clips, which you can use in ads, posts, or other designs for show-stopping results.
Font Collections
English/Latin, Cyrillic and Hebrew alphabets – VistaCreate software supports them all. Choose from over 250 font styles or upload your own favorite fonts.
How to Create a Facebook Ad
Choose a format
Select your ad format to get started – or any format Facebook allows.
Select a template
VistaCreate Ad creator offers an amazingly diverse library of templates. Select the one you like and get started!
Customize
Add, subtract, or edit any element to personalize your Facebook ad.
Save and post
Download your ad banner or share it on Facebook directly from the VistaCreate editor interface.
FAQ
What is the resolution of the Facebook Ad format?
The resolution of the Fb advertising format is 1200x628 px.
Do you have a text grid option for Facebook ad?
Yes, we do. Click the Show text grid green button on the upper-left side of the artboard to apply the text grid to your design.
Can you offer some inspiration to generate a Fb Ads that will boost?
Yes! We have a great choice of pre-designed Fb ads templates split into categories.
720+ Facebook Ad Patterns
You will find the exact template that fits your industry and theme among VistaCreate's big library of Fb ad designs.
25,000+ Premium Layouts
Create anything for your advertising needs with our massive library of fascinating layouts.
If you have a business, you need a Facebook Business Page. With 1.82 billion daily active users, Facebook is simply not a social network you can ignore.
Perhaps that's why more than 200 million businesses use Facebook's free services. That includes business Pages—yes, creating a Facebook Page is a free way to market your business.
The good news is, creating a Facebook account for a business is pretty simple, and you likely already have all the components you need to get started. Let's dive in.
Bonus:Download a free guide that teaches you how to turn Facebook traffic into sales in four simple steps using Hootsuite.
What is a Facebook Business Page?
A Facebook Page is a public Facebook account that can be used by brands, organizations, artists and public figures. Businesses use Pages to share contact information, post updates, share content, promote events and releases, and — perhaps most importantly — connect with their Facebook audiences.
Pages can be connected to Facebook ad accounts and Facebook Shops.
How to create a Facebook Page for business
Before you can sign up for your Facebook Business Page, you need to log into your personal Facebook account. Don't worry—the information from your personal account will not be publicly visible on your business Page.
This is simply because every business Page is managed by one or more page administrators. The administrators are people with personal Facebook accounts. Your personal account works like the key to let you into your new business Page. If you have team members helping you with your Page, their personal accounts will also unlock their specific roles and capabilities.
So, if you're not already logged into your personal account, log in now, then dive into the Page creation steps.
Step 1: Sign up
Go to facebook.com/pages/create.
Enter your business information in the panel on the left. As you do so, the page preview will update in real time on the right.
Source: Facebook
For your page name, use your business name or the name people are likely to search for when trying to find your business.
For category, type a word or two that describes your business and Facebook will suggest some options. You can choose up to three of the suggestions.
Source: Facebook
Next, fill in the Description field. This is a short description that appears in search results. It should be just a couple of sentences (maximum 255 characters).
When you're happy with your description, click Create Page.
Source: Facebook
Step 2. Add pictures
Next, you'll upload a profile and cover images for your Facebook Page. It's important to create a good visual first impression, so choose wisely here. Make sure the photos you choose align with your brand and are easily identifiable with your business.
You'll upload your profile photo first. This image accompanies your business name in search results and when you interact with users. It also appears on the top left of your Facebook Page.
If you have a recognizable brand, using your logo is probably the safest way to go. If you're a celebrity or public figure, a picture of your face will work like a charm. And if you're a local business, try a well-shot image of your signature offering. The important thing is to help a potential follower or customer to recognize your page immediately.
As we explain in our post on the best image sizes for all social networks, your profile image should be 170 x 170 pixels. It will be cropped to a circle, so don't put any critical details in the corners.
Once you've chosen a great photo, click Add Profile Picture.
Now it's time to choose your Facebook cover image, the most prominent image on your Page.
This image should capture the essence of your business and convey your business or brand personality. Facebook recommends you choose an image that's 1640 x 856 pixels.
Once you've selected an appropriate image, click Add Cover Photo.
Source: Facebook
After you upload the photos, you can use the buttons in the top right of the preview to toggle between desktop and mobile views. Use these to make sure you're happy with how your images look in both displays. You can drag the images in the left column to adjust their positioning.
Source: Facebook
When you're happy with your selections, click Save.
Ta-da! You have a Facebook Business Page, although it is extremely sparse.
Of course, while the skeleton of the Facebook Page for your business is now in place, you've still got a lot of work to do before you share it with your audience.
Step 3. Connect your business to WhatsApp (optional)
After you click Save, you'll see a pop-up box asking if you want to connect your business to WhatsApp. This is optional, but it does allow you to add a WhatsApp button to your page, or send people to WhatsApp from Facebook ads.
Source: Facebook
If you want to connect your business to WhatsApp, click Send Code. Otherwise, close the window to continue without connecting WhatsApp. You'll get one more pop-up box asking if you're sure. Since we're skipping this, for now, we'll click Leave.
Step 4: Create your username
Your username, also called your vanity URL, is how you tell people where to find you on Facebook.
Your username can be up to 50 characters long, but don't use extra characters just because you can. You want it to be easy to type and easy to remember. Your business name or some obvious variation of it is a safe bet.
To create your username, click Create Username on the Page preview.
Enter the name you want to use. Facebook will let you know if it's available. If you get a green checkmark, you're good to go. Click Create Username.
Source: Facebook
You'll get a confirmation pop-up. Just click Done.
Step 5: Add your business details
While you might be tempted to leave the details for later, it's important to fill out all of the fields in your Facebook Page's About section right from the start.
As Facebook is often the very first place a customer goes to get information about you, having it all there is important. For example, if someone is looking for a business that's open till 9, they want to confirm this information on your Page. If they can't find it, they'll surely keep looking until they find another place that's more forthcoming.
Fortunately, Facebook makes this very easy to complete. Simply scroll down on your Page view to the section called Set Your Page Up for Success and expand the item called Provide Info and Preferences.
Source: Facebook
Fill in the appropriate details here, starting with your website.
If your business is open to the public during specific hours, make sure to enter those here. This information appears in search results.
Don't forget to complete the Add an action button section.
Facebook's built-in call-to-action button makes it very easy to give the consumer what they're looking for and it allows them to engage with your business in real time.
The right CTA button will encourage visitors to learn more about your business, shop, download your app, or book an appointment.
To add your CTA, click the blue box that says Add Button, then choose which kind of button you want.
Source: Facebook
If you don't want to complete all of these steps now, you can always access them later. In the Manage Page menu on the left, just scroll down to Edit PageInfo.
Bonus:Download a free guide that teaches you how to turn Facebook traffic into sales in four simple steps using Hootsuite.
Get the free guide right now!
If at any time you want to take your Facebook Business Page offline while you work on the details, you can choose to unpublish your page. From the Manage Page menu, click Settings, then General. Click Page Visibility and change the status to Page unpublished.
Source: Facebook
Follow the same steps to republish your page when you're ready.
Step 6. Create your first post
Before you start inviting people to like the Facebook Page for your business, you should post some valuable content. You can create your own posts, or share relevant content from thought leaders in your industry.
For inspiration, check out our blog post on Facebook marketing.
You could also create a specific type of post, like an event or offer—just click one of the options in the Create box at the top of your page.
Source: Facebook
Make sure that whatever you post offers value for your visitors when they arrive at your Facebook Business Page, so they'll be inclined to stick around.
Step 7. Invite an audience
Your Facebook Business Page now represents a robust online presence that will make potential customers and fans feel comfortable interacting with you.
Now you need to get some followers!
Start by inviting your existing Facebook friends to like your Page. To do so, just scroll down to the bottom of the Set Your Page up for Success box and expand the section called Introduce Your Page.
Source: Facebook
Click the blue Invite Friends button to bring up a list of your personal Facebook friends. Select which friends you want to invite, then click Send Invites.
Use your other channels, like your website and Twitter, to promote your new page. Add "follow us" logos on your promotional materials and email signature. If you're comfortable doing so, you can ask your customers to review you on Facebook, too.
To grow your audience quickly, check out our post on how to get more Facebook likes.
How to optimize your Facebook Business Page
Now that you know how to create a Facebook Page for business, it's time to think about ways to optimize your Page. These strategies will help maximize engagement so you meet your Facebook (and social media) marketing goals.
Here's a quick video overview of the steps you can take to optimize your Facebook Business Page. We'll dig into these components in more detail below.
Add a pinned post
Is there important information you want all visitors to your Page to see? A promotion you don't want them to miss? A top-performing piece of content you want to show off? Put it in a pinned post.
A pinned post sits at the top of your Facebook Business Page, just under your cover image. It's a great place to put an attention-grabbing item that will draw your visitors in and make them want to stick around.
Start by publishing a new post, or scrolling down your feed to find an existing post you want to pin to the top of your Page. Click the three dots on the top right of the post, then click Pin to Top of Page.
Source: Facebook
Once you've pinned the post, it will appear under the heading PINNED POST at the top of your page. This is only for your internal view. To visitors, it will just show as the first item under Posts, with a blue thumbtack icon to indicate it's pinned.
Source: Facebook
Make the most of templates and tabs
Tabs are the different sections of your Facebook Page, like the About section and Photos. You can customize which tabs you want to include and the order in which they appear in the left Manage Page menu.
If you're not sure which tabs to include, check out Facebook's various templates.
Source: Facebook
Each template has a set of buttons and tabs designed for particular types of business. For example, the Restaurants & Cafes template includes tabs for a menu, offers and reviews.
To access templates and tabs, click Settings in the Manage Page menu, then Templates and Tabs.
Like other Pages
Since Facebook is, after all, a social network, it's a good idea to use your Page to build a community for your business.
One way to build community is to connect with other Pages that are relevant to your business (but not competitors).
For example, if you run a shop in a popular shopping area or mall, you could connect with other shops in the same area. Think of this as an online version of your local business improvement association or chamber of commerce.
If you have a virtual business, you could connect with other businesses in your industry that could provide additional value for your followers without competing directly with your products.
To follow other businesses, navigate to their Facebook page, then click the more icon (three dots) under the page's cover photo. Click Like as Your Page. If you have more than one Facebook Business Page, choose which one you want to use to like the other business, then click Submit.
Source: Facebook
Pages will receive a notification when you like them and may check out your Page or even give you a like in return.
Your business page gets a news feed separate from your personal profile, so you can interact with all the businesses you follow from your business profile. To see all the content from the Pages you've liked as your Page, just select your Page and click News Feed in the left menu. If you haven't liked any Pages yet, Facebook will provide a list of suggestions to get you started.
Source: Facebook
Join Groups as your Page
Facebook Groups represent an organic opportunity to reach many people who are interested in a specific topic, but without paying for ads. Joining and posting to a relevant Group as your Facebook Page helps anyone who is curious about your post click through to your business page, rather than your personal profile. Here's a quick tutorial that explains how to join as a Page (it can be tricky!)
Review your settings
Your Facebook Page settings allow you to get into some pretty fine detail about who can administer the Page, where your posts are visible, words banned from the Page, and so on. You can also see people and Pages who have liked your page, control your notifications, and so much more.
Think of the Settings tab as your behind-the-scenes console for every adjustable parameter available to you. Take a few minutes to go through each setting and make sure that it's optimized for how you want to manage the Page and how you want your audience to interact with you.
To access your settings, just click Settings at the bottom of the Manage Page menu.
Source: Facebook
Check your settings regularly, as your preferences and requirements may change as your business—and social following—grows.
For even more control over who can administer your Page, and to control the roles filled by team members, contractors and agencies, consider setting up Facebook Business Manager.
Learn from Page Insights
The more information you have about your audience, the more content you can create to satisfy their needs.
Facebook Page Insights makes it easy to gather data about how your fans are interacting with your Page and the content you share. To access Page Insights, click Insights in the Manage Page menu.
Source: Facebook
Insights gives you information about your Page's overall performance, including some data on audience demographics and engagement. You can see metrics on your posts so you can understand how many people you're reaching.
You'll also see how many comments and reactions are gained from specific posts—data that helps you plan future content.
A key feature of Insights is the ability to see how many people have clicked on your call-to-action button, website, phone number, and address. This data is divided by demographics such as age, gender, country, city and device, making it easier for you to tailor future content to your audience. To access this information click Actions on Page in the Manage Page menu.
For more details, check out our post on how to use Facebook Page Insights.
Link to your Facebook Page from other web pages
Backlinks help boost the credibility of your Facebook Business Page and may help improve your search engine ranking. They also help direct new potential followers to your page.
Include a link to your Facebook Page at the bottom of your blog posts and where appropriate on your website. Encourage other companies and bloggers to do the same when you collaborate.
Once your Facebook Page is set up and optimized, check out our full guide to Facebook marketing to take your Facebook strategy to the next level.
Manage your Facebook Business Page alongside all your other social media profiles using Hootsuite. From a single dashboard, you can create and schedule posts, engage followers, monitor relevant conversations, measure (and improve!) performance, and much more.
Get Started
Easily manage your Facebook page (+ other social media accounts) and save time with Hootsuite. Schedule, engage, analyze, perform.
Facebook Theme at Bootply.com is a device-agnostic, modern responsive design that is customizable. It's designed to work well on desktops, laptops, tablets and mobile phones.
MIT Bootstrap 3.x
A Facebook inspired template and theme that features a responsive collapsible off-canvas sidebar.
When the sidebar is collapsed, it can be toggled with a chevron arrow so that it slides in from the left to 1/3 of the screen width.
This template also features a navbar search form, status post modal and content cards.
Like this? Cast your vote...
+7
Click Here
Share the Love
Favorite Themes
Lattes Lattes is a multipurpose theme with modern and clean elements, using plenty of white space to put most of the focus on your content. Lattes boasts a fully responsive design, clean HTML markup, bootstrap framework, portfolio grid and an amazing responsive navigation.
Rage Rage is a creative and fresh-look Multipurpose template made for Creative, Portfolio, Business website. Rage is a clean Multipurpose template with design features specifically for Creative site.
Parallax One A stunning, responsive Free One Page WordPress theme excellent for Creative Individuals!
More
Similar Themes
TMONE
The ONE Subscription to Get Everything for Building Websites 0 + items The first service to include a full product range from extensions to templates and graphics Browse items View plan Feat
Ready to Use - TemplateMonster
www.templatemonster.com
Ready to Use - TemplateMo
Let TemplateMonster Build a Website For You! Get yourself a ready-made website for a flat price! Ready to Use website - the best way to start your business online
Bitunet
The Gold Rush is no longer popular. Nowadays people are immersed in cryptocurrencies. Exactly for this reason we are ready to announce a brand new ready-made template called Bitunet. Deali
Greetings my dear friends! A warm welcome to myblog on Facebook and Instagram marketing! For those who don't know me, my name is Katia. I'm a Facebook & Instagram expert living in Finland — a beautiful Nordic country. My blog is visited by some 10 000 unique visitors daily and is well-known for its clarity — I always go straight to the point.
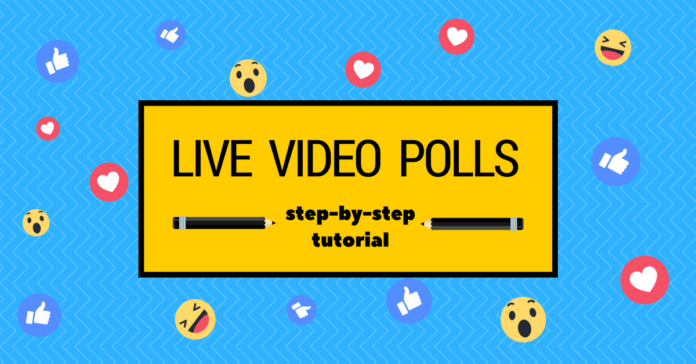
Today I would love to share with you a detailed instruction on how to create a Facebook Live poll video with Video React.
You probably have noticed that Facebook Live poll videos are the hottest trend right now; you could say that they have swept through the social media marketing community like a tidal wave. I know that many marketers would love to try this new format on their pages but don't know how to create it.
You might already have seen a bunch of complicated tutorials on the internet that perhaps pushed you off from even trying. But no need to despair! In this article, I will show you how to create a Facebook Live poll video in just about 15 minutes without any programming skills or special technical knowledge.
LATEST UPDATE Dear friends, the service I mention in this article doesn't work anymore. I recommend you to use GoUpLIVE instead. It is even easier to use and they have more interesting interactive video templates. On top of that, they stream your live polls from their servers, so you don't need to do it from your computer anymore.
If you would like to learn more about the templates offered by UpLIVE, check out this article.
Happy polling! 🙌🏼
Facebook Live poll: what is this?
A short introduction for those of you, who haven't heard about Facebook Live polls before.
Basically, Facebook Live poll is a simple video consisting of the following elements: 1) a question, 2) two or four images representing answer options, 3) the reactions a user is supposed to use and 4) vote counters that are updated in real time.
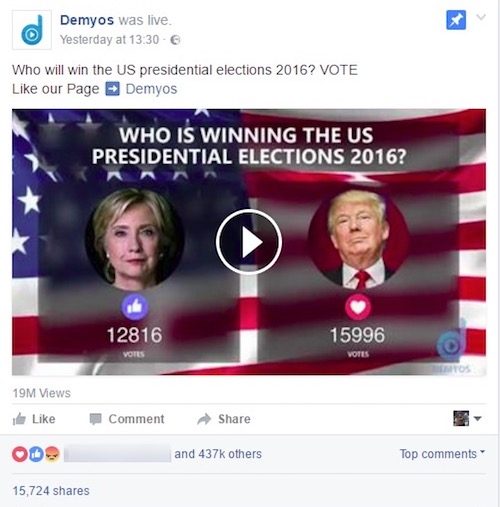
This is the Live poll from where it all started: Clinton vs Trump. It got more than 19 million views, 437,000+ reactions and more than 15,000 shares.
Why are Facebook Live poll videos more efficient than normal page posts?
The answer to this question is very simple. There are at least two reasons for that:
First of all, Facebook tends to push Live videos higher in the Newsfeed. Live videos get an extra organic boost from the algorithm while they are live. After that, a live video is treated as a normal video post which also gets a good organic reach. In case you didn't know, Facebook spent hundreds of millions of dollars to promote Live events. So, it goes without saying, that Facebook is right now trying to encourage people to use this feature.
Secondly, Facebook live polls are a new cool feature and people love all things shiny and new. Live polls stand out in people's feeds and attract more attention. For this reason, now is the best time to jump on the live poll train. You want to be one of the first ones, rather than last, to use this new feature. This way you get the best results.
How to create a Facebook Live poll video in 5 easy steps
UPDATE: Hey guys! I have recently found a new cool tool called UpLive. They have some unique Facebook LIVE video templates that I haven't seen any other services offering. I personally love their Reveal template as it works just great. If you are interested, check them out. I also have a new article with in-depth description of all their templates and how you can use them to promote your Facebook page. The article is here.
Happy LIVE polling! 🙌🏼
– Ekaterina Frolova
In this tutorial we will create a quick and easy live poll with the help of a service called Video React. Note: this isn't a free service but it is definitely worth every cent. It willsave you a lot of precious time and, most importantly, your nerves.
I have already created several Facebook Live polls with Video React and I absolutely love it. It took me literally some 15 minutes to create my first poll and even less for the next ones.You don't have to deal with any HTML-templates. You won't even need to create a Live event on Facebook; Video React will do the whole job for you.
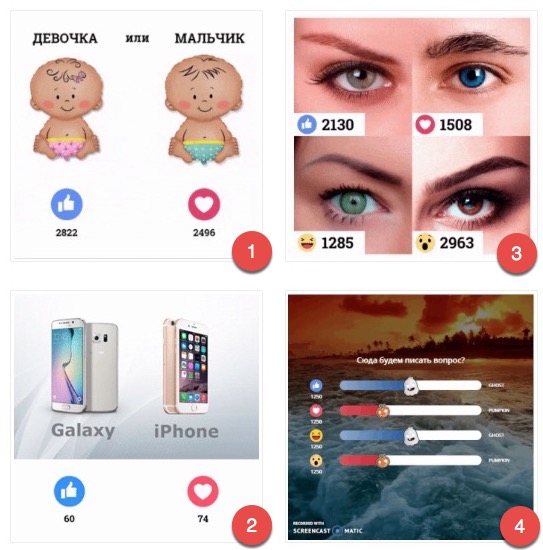
You will be able to createfour types of Facebook live polls with the help of Video React:
a poll with two photos (for example, cats vs dogs) and reactions 👍 and ❤
a poll with one photo and the same two reactions (👍 & ❤). You might want to use this one if you want to create your own image with special fonts or your branding. I use Canva to create an image for this type of poll.
a poll with four photos and four different reactions.
NEW FEATURE: a poll with a question and four horizontal lines where the amount of votes is displayed. I really love this poll type. I have seen one major Facebook page using a poll like this to compare footballers (the European kind 😉 ). I think this template is great for encouraging audience to vote for their favourite celebrities, foods, drinks, flavours, clothing items and so on.
You can see each type displayed in the picture below.
In a nutshell,all you need to do is follow these five steps:
sign up for Video React;
download a free software for broadcasts called OBS Studio (works with Windows OS, Mac OS and Linux OS);
in Video React, create your Facebook Live poll post (upload your images and write the post text);
copy and paste the key and link (generated for you in Video React) into the OBS Studio software;
click the "Start streaming" button.
That's it! 😃 It's that simple! No programming or technical knowledge needed!
Step-by-step tutorial: how to create a Facebook Live poll
1. Sign up for Video React.
Go toVideo React's website.
Click on the red button «Create Facebook Live Voting».
A pop up window will appear and ask you to sign in. Sign in to your personal Facebook profile and click on "Continue as [your name]."
Give the application permission to have access to your Facebook pages and to post on them.Click «OK». Don't switch off any of the permissions because otherwise the app won't be able to do the job for you. It needs access to your pages and the permission to post since it will actually post your Live poll to your page in one click.
2. Create your Facebook Live Poll post
In this step we will work on the Facebook post that your audience will see.
First, from the dropdown list, select the page on which your poll will be posted.
Next,choose the poll format you want to use: 1 or 2 images with two Facebook reactions or 4 photos with four different reactions.
If you decided to use the 2 photos option, add a title to each photo. Also, you can choose either «or» or «vs». This will be displayed between titles.
If you wish, you canadd a color background (optional) that will appear behind the two photos.
Upload the photos.
Select the Facebook reactions that you would like to use in your poll. These are trackable reactions and their count will be displayed on the video in real time.
And finally,write your post caption. Remember to include the question you want to ask your audience; they should have a clear call-to-action to act upon. Don't make the caption too long. This will only distract your audience from the poll.
Save your poll post to continue.
Click to enlarge the image.
3. Choose your payment plan
When you click on the «Save» button, you will be asked to choose a payment plan.
You havetwo options here:
a one month subscription for unlimited polls for unlimited Facebook pages;
or a life time subscription for unlimited polls for unlimited Facebook pages.
For the time being you can only pay with PayPal. However, I believe that there will be more payment options in the future.
Once you have paid for the service, you will get back to the post design page. Click on the «Save» button once again.
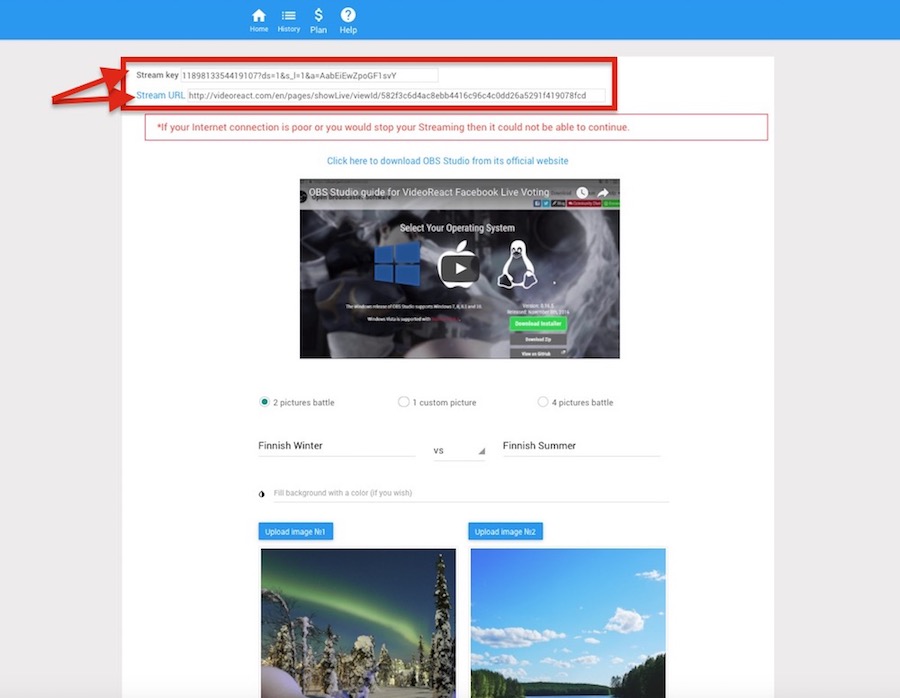
4. Automatically generate «Stream Key» and «Stream URL»
Now we have come to an important step. Video React will automatically generate a «Stream Key» and «Stream URL» for you. You will need to enter the key and the URL into the OBS Studio software. I will show you how to do it in the following steps.
IMPORTANT! Keep the Stream Key a secret. Anyone who gets access to your key will be able to stream video to your post. The stream key is valid for 7 days.
5. Download and configure OBS Studio
Open a new browser tab.Download and install OBS Studio. OBS Studio is a free open source software for video recording and live streaming. We need it in order to be able to show the reactions vote count in real time in our Facebook Live video.
Now, let's set up your streaming software. It is very easy to do, just follow my step-by-step instructions below and you will be set for success 🙂
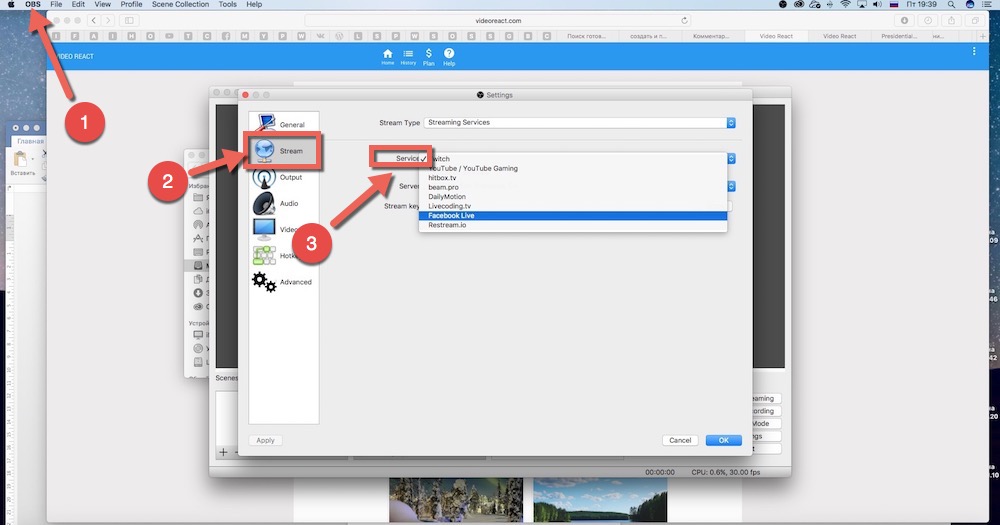
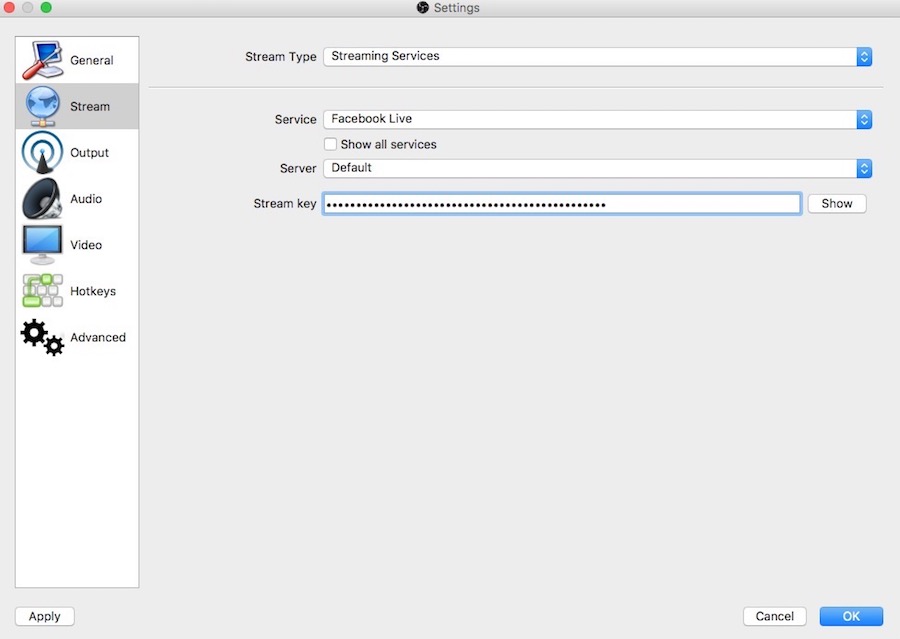
1. Open the program. 2. Go to the program «Preferences», then choose the «Stream» tab as shown on the screenshot below. Then, choose «Facebook Live» in the field called «Stream».
3. Go to your Video React tab. There you should see a field called «Stream key». Copy the key and paste it into OBS Studio, in the field (that also is) named «Stream key».
4.Next, in OBS Studio, go to the «Video» tab and set the video resolution to768×768. Do it in both fields: «Base Resolution» and «Output Resolution». Save the changes by clicking «OK».
IMPORTANT! Type in the resolution numbers manually, don't copy and paste. When I first tried to copy/paste the numbers, my computer couldn't save them. This resulted in an incorrect video output, so, please, pay attention to this step.
5.Now, go to the «Audio» tab and make sure that you havetotally disabled all the audio output. See the example below. Save the changes by clicking «OK».
6.In the section called «Scenes», create a new scene by pressing «+» (see picture below, lower left corner). Give your scene a name, for example, the name of your poll. It doesn't really matter what name you give. You can leave the default name, if you wish. Press «OK» to save the changes.
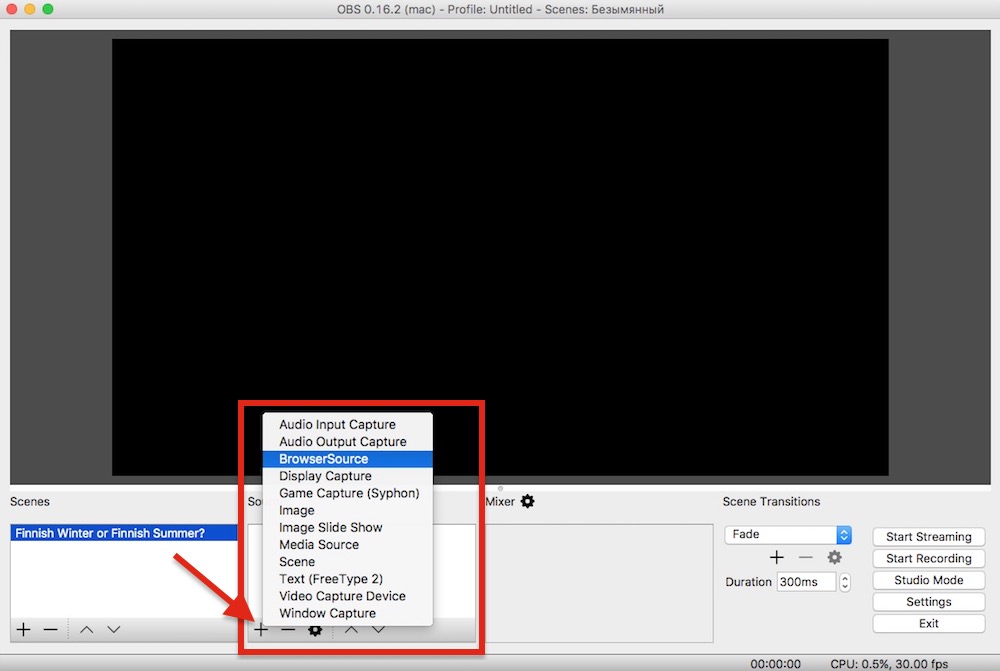
7.In the section called «Sources», click on the «+» (see picture below)and select the option «BrowserSource». Give the source a name or just leave the default name. Press «OK» to save the changes.
8.In the pop-up window (see picture below), delete the link in the URL field. Go back to your Video React tab. There you should see a field called «Stream URL». Copy the key and paste it into OBS Studio, in the field (that also is) named«Stream URL».
Next, in the fields «Width» and «High» enter the resolution 768 and 768; otherwise the picture will not be displayed correctly. Save the changes by clicking on the button «OK».
9.Well done! We are almost there and ready to launch our first Facebook Live video poll.
Before you post your poll, pleasecheck that your video is being displayed correctly. Look at the example below. Your image should be surrounded by a grey area. Only the area inside of the red lines will be visible to Facebook users. If you happen to see a black area around your video image, go back to the steps #4 and #5/4 in this section and make sure that the video resolution is set to 768 x 768.
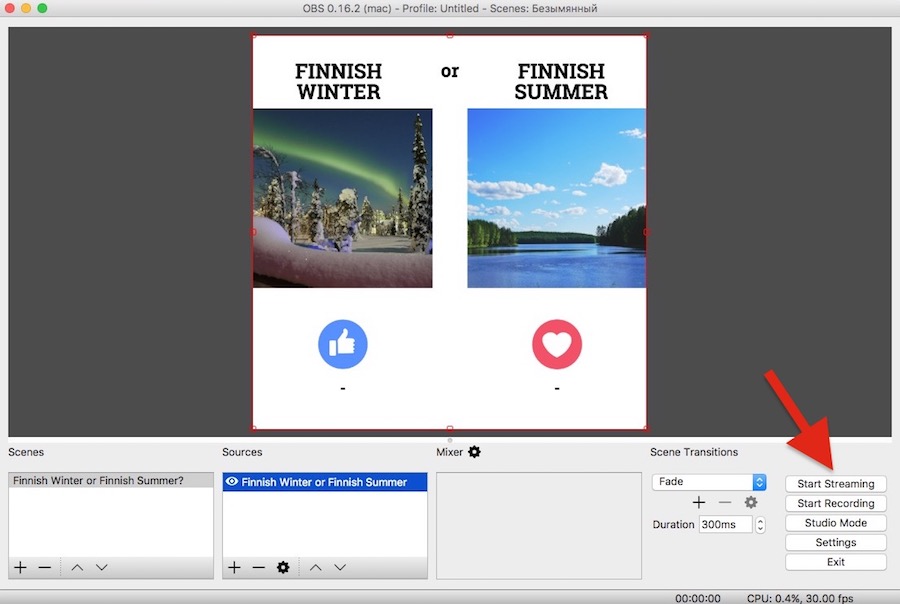
8.If everything is fine and you are ready to go, press the button «Start Streaming».
IMPORTANT! When you press on «Start Streaming», your Live poll will be automatically published on your Facebook page.
What you should do when your Facebook Live poll video is streaming
Once you have pushed your video live, monitor that everything goes according to plan.
The most important thing is that youkeep your OBS Studio window open during the whole streaming time! This is crucial because your audience will see what is displayed in this window. If your computer freezes or shuts down, your streaming will go offline.
How to increase the reach of your Facebook Live poll?
Here are some simple recommendations for you:
Pin your Facebook live poll to the top of your page to gain as much exposure as possible.
Share the poll on your personal timeline to give the post the first boost. If you have colleagues, partners or employees, ask them to share the post as well.
Share the poll in relevant Facebook groups to further increase the reach.
Embedthe live streaming poll to your website or blog.
If you have newsletter subscribers, send them an email with a kind invitation to vote. Remember to include the link to your poll 😉 I highly recommend to prepare the newsletter in advance — Facebook allows maximum 4 hours of streaming.
Promote the link to your live poll onother social media channels.
Things to keep in mind before you start your Facebook Live poll
In order to run a Facebook Live streaming event,you need a high speed internet connection and a good computer! If your internet is turned off or your computer freezes, your live poll will go offline as well.
The maximum duration of the live video on Facebook is4 hours. Make sure that you can be around your computer all this time.
OBS Studio must be open during the entire streaming time. You can use your computer, but do not close the streaming window.
You can run one streaming at a time. This means that you cannot run simultaneously two or more live polls on the same computer.
I hope this information will help you create and run a successful Facebook Live Poll! I'll be glad to hear from you in the comments section below.


 4.Next, in OBS Studio, go to the «Video» tab and set the video resolution to768×768. Do it in both fields: «Base Resolution» and «Output Resolution». Save the changes by clicking «OK».
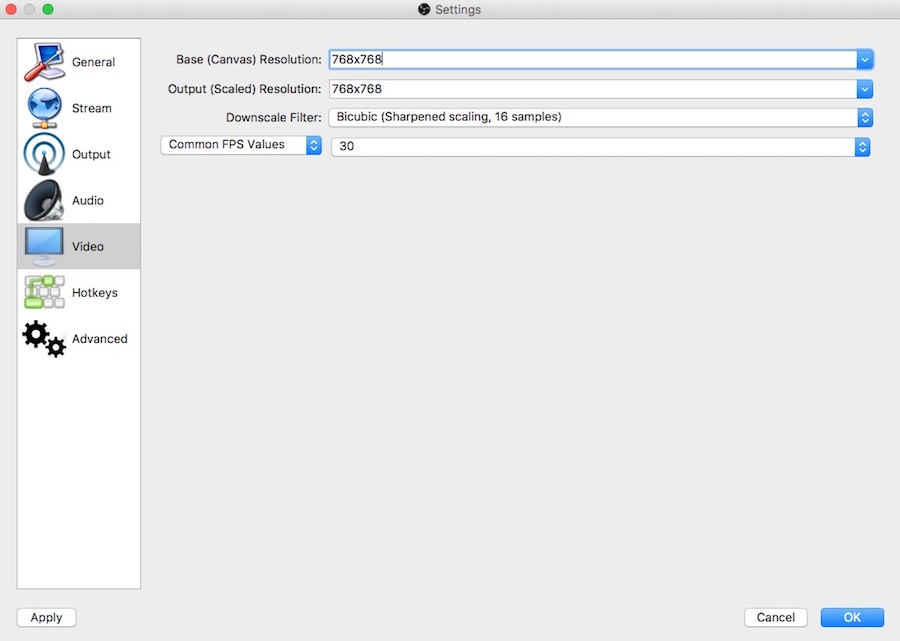 5.Now, go to the «Audio» tab and make sure that you havetotally disabled all the audio output. See the example below. Save the changes by clicking «OK».
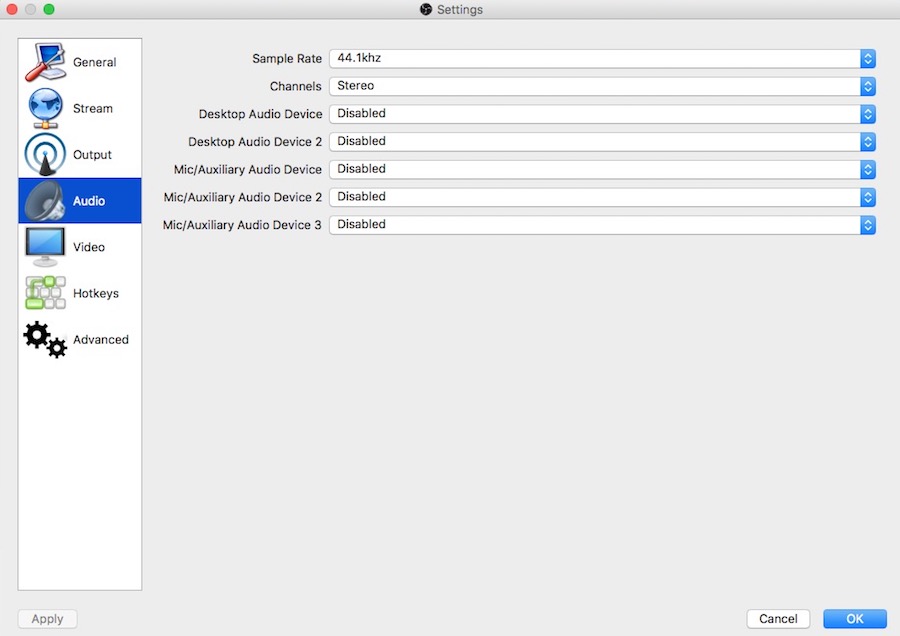 6.In the section called «Scenes», create a new scene by pressing «+» (see picture below, lower left corner). Give your scene a name, for example, the name of your poll. It doesn't really matter what name you give. You can leave the default name, if you wish. Press «OK» to save the changes.
 8.In the pop-up window (see picture below), delete the link in the URL field. Go back to your Video React tab. There you should see a field called «Stream URL». Copy the key and paste it into OBS Studio, in the field (that also is) named«Stream URL».
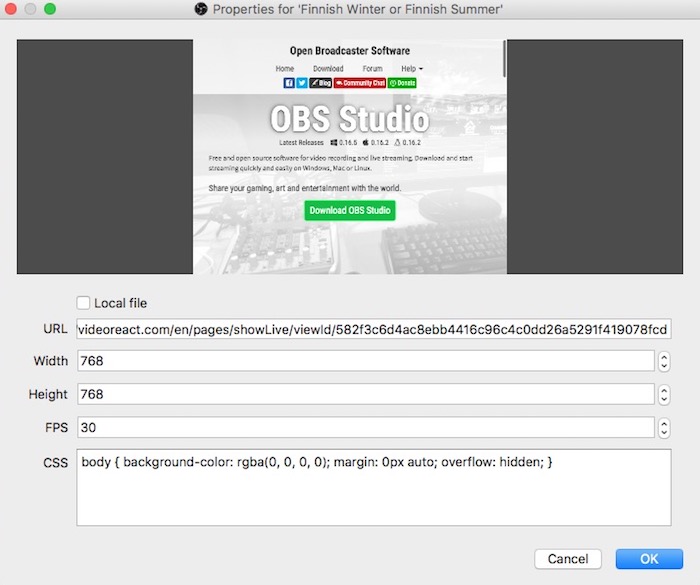 9.Well done! We are almost there and ready to launch our first Facebook Live video poll.